Lunchbox Laptop
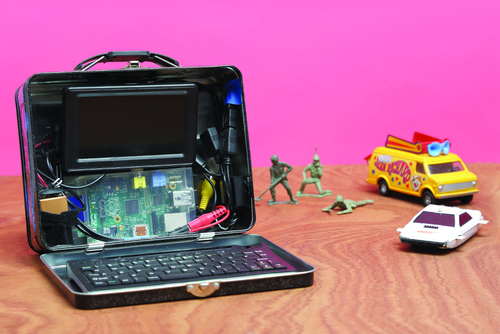
This easy-to-make portable computer has many of the capabilities of a regular laptop, but it is much cheaper to build and far more fun to carry around.
Step One: Make a Battery Pack
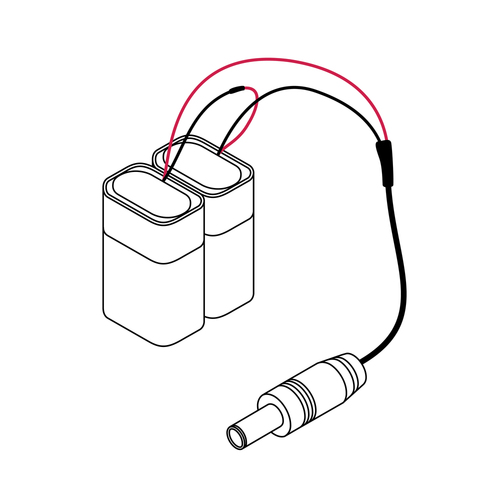
To power the project you need to make an 18V battery pack using two 9V batteries wired in series.
Start by sliding a small piece of shrink tube over the negative (black) wire from one of your 9V battery connectors.
Solder the black wire to the positive (red) wire from the other battery connector and seal the connection with the shrink tube.
Solder the remaining positive and negative wires to the corresponding wires of a 2.1mm male plug, again sealing each connection with shrink tube to prevent shorts.
Finally, plug your 9V batteries into the connectors and you have an 18V battery with an easy-to-use-plug.
Step Two: Attach the Power Converter
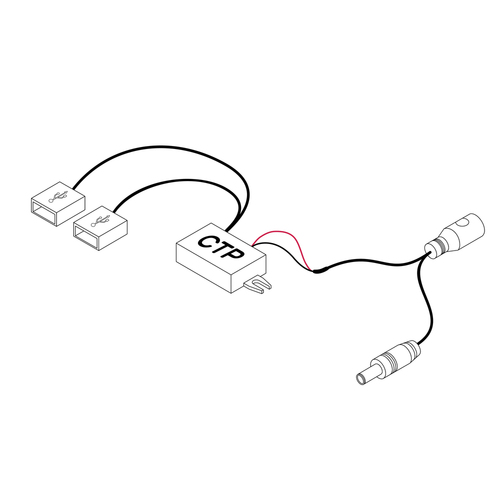
18V is too much power for a Raspberry Pi, so you need to convert it to a 5V and add a USB connection.
To do this, take the 2.1mm female-to-male Y cable and cut off one of the two male ends. Strip the end to reveal the positive and negative wires and solder these to the corresponding wires on the power convertor (remember to seal all of your connections with shrink tube).
Now, when you plug your batter into the Y cable, the power will go to both the power convertor and the other male plug (which will go to the LCD).
Step Three: Bench Test
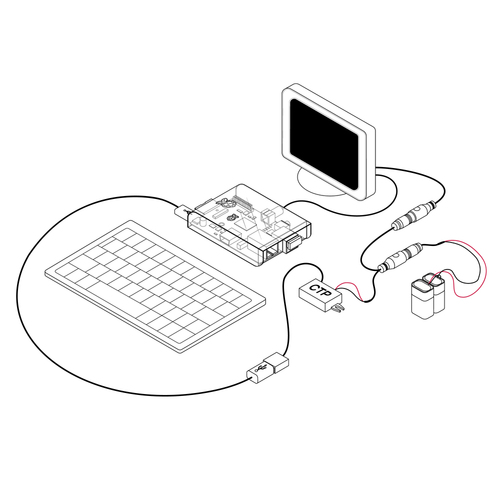
Using a micro USB cable, connect one of the power convertor's USB sockets to the Raspberry Pi's power socket.
With an RCA cable (or male-to-male adaptor), plug the yellow video plug from the LCD into the yellow RCA jack on the Raspberry Pi.
Connect the male plug from the 2.1mm U cable to the red power jack on the LCD.
Finally, connect the battery pack to the 2.1mm Y cable. The Raspberry Pi should start up automatically and after a few seconds the display should light up and show it booting.
Step Four: Assemble
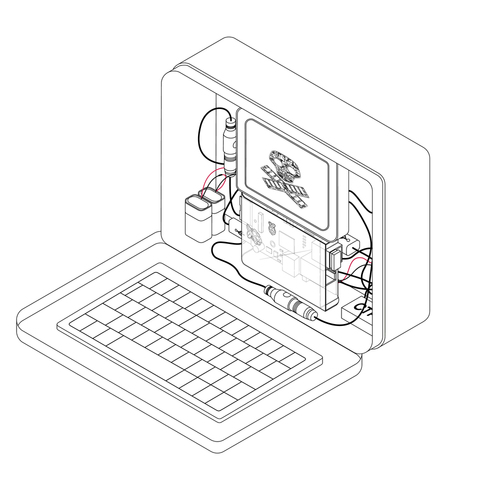
With your lunchbox open and facing you, use double-sided foam tape to attach the Raspberry Pi (in a case) to the back/bottom of the box. Tape the LCD above it, as shown.
Using more foam tape, attach a Velcro strap at the lower left and use that to hold the batteries in. You should also use foam tape to fit the power convertor at the right side of the lunchbox.
Finish up by taping the keyboard to the inside of the lunchbox's lid. Remember that if you need to get to the back of the keyboard to replace its batteries or charge it, it may be best to tape along one edge so the keyboard can hinge upwards.